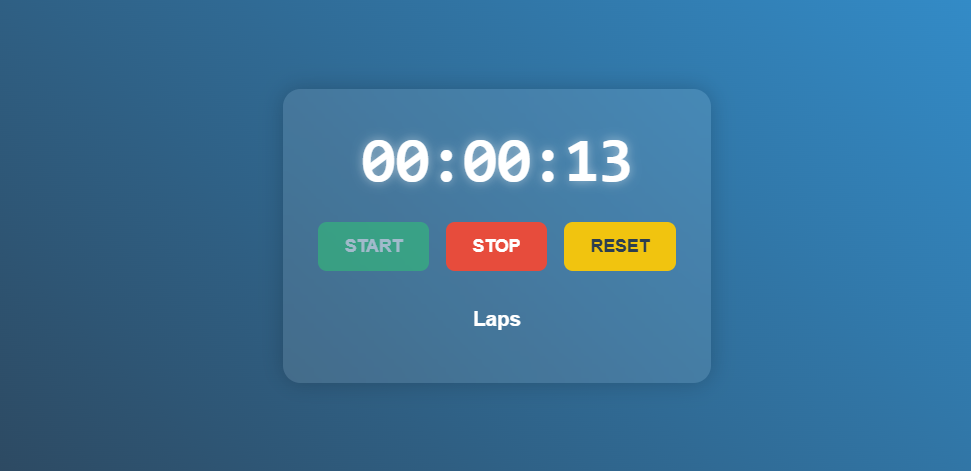
How to Create a Stopwatch Using HTML, CSS, and JavaScript
Creating a stopwatch using HTML, CSS, and JavaScript is an excellent beginner-level project that helps you learn the basics of web development. In this tutorial, we will guide you through creating a functional stopwatch that includes start, stop, and reset features.
Step-by-Step Guide to Create a Stopwatch
Step 1: Setting Up the Basic HTML Structure
Start with a simple HTML file that includes the necessary structure for the stopwatch.
<html lang="en">
<head>
    <meta charset="UTF-8">
    <meta name="viewport" content="width=device-width, initial-scale=1.0">
    <title>Stylish Stopwatch</title>
    <link rel="stylesheet" href="styles.css">
</head>
<body>
    <div class="container">
        <div class="stopwatch">
            <div class="display">00:00:00</div>
            <div class="controls">
                <button id="startBtn" class="btn">Start</button>
                <button id="stopBtn" class="btn" disabled>Stop</button>
                <button id="resetBtn" class="btn" disabled>Reset</button>
            </div>
            <div class="Laps ">
                <h3>Laps</h3>
                <ul id="lapsList"></ul>
            </div>
        </div>
    </div>
    <script src="index.js"></script>
</body>
</html>
Step 2: Adding Styling with CSS
Create a styles.css file to style the stopwatch.
* {
    margin: 0;
    padding: 0;
    box-sizing: border-box;
}

body {
    font-family: 'Arial', sans-serif;
    min-height: 100vh;
    display: flex;
    justify-content: center;
    align-items: center;
    background: linear-gradient(45deg, #2c3e50, #3498db);
}

.container {
    text-align: center;
}

.stopwatch {
    background: rgba(255, 255, 255, 0.1);
    padding: 2rem;
    border-radius: 1rem;
    backdrop-filter: blur(10px);
    box-shadow: 0 0 20px rgba(0, 0, 0, 0.2);
}

.display {
    font-size: 3.5rem;
    font-weight: bold;
    color: #fff;
    text-shadow: 0 0 10px rgba(255, 255, 255, 0.5);
    margin-bottom: 1.5rem;
    font-family: monospace;
}

.controls {
    display: flex;
    gap: 1rem;
    justify-content: center;
    margin-bottom: 1.5rem;
}

.btn {
    padding: 0.8rem 1.5rem;
    font-size: 1rem;
    border: none;
    border-radius: 0.5rem;
    cursor: pointer;
    transition: all 0.3s ease;
    text-transform: uppercase;
    font-weight: bold;
}

.btn:disabled {
    opacity: 0.5;
    cursor: not-allowed;
}

#startBtn {
    background-color: #2ecc71;
    color: white;
}

#stopBtn {
    background-color: #e74c3c;
    color: white;
}

#resetBtn {
    background-color: #f1c40f;
    color: #2c3e50;
}

.btn:hover:not(:disabled) {
    transform: scale(1.05);
    box-shadow: 0 0 10px rgba(0, 0, 0, 0.2);
}

.laps {
    margin-top: 2rem;
    color: white;
}

.laps h3 {
    margin-bottom: 1rem;
}

#lapsList {
    list-style: none;
    max-height: 200px;
    overflow-y: auto;
}

#lapsList li {
    background: rgba(255, 255, 255, 0.1);
    margin: 0.5rem 0;
    padding: 0.5rem;
    border-radius: 0.5rem;
}

@media (max-width: 480px) {
    .display {
        font-size: 2.5rem;
    }

    .controls {
        flex-direction: column;
    }

    .btn {
        width: 100%;
    }
}
Step 3: Implementing Functionality with JavaScript
Create a script.js file to handle the stopwatch logic
let startTime;
let elapsedTime = 0;
let timerInterval;

const display = document.querySelector('.display');
const startButton = document.getElementById('startBtn');
const stopButton = document.getElementById('stopBtn');
const resetButton = document.getElementById('resetBtn');
const lapsList = document.getElementById('lapsList');

function updateDisplay() {
    const hours = Math.floor(elapsedTime / 3600000);
    const minutes = Math.floor((elapsedTime % 3600000) / 60000);
    const seconds = Math.floor((elapsedTime % 60000) / 1000);

    display.textContent = `${String(hours).padStart(2, '0')}:${String(minutes).padStart(2, '0')}:${String(seconds).padStart(2, '0')}`;
}

function startTimer() {
    startButton.disabled = true;
    stopButton.disabled = false;
    resetButton.disabled = false;

    startTime = Date.now() - elapsedTime;
    timerInterval = setInterval(() => {
        elapsedTime = Date.now() - startTime;
        updateDisplay();
    }, 10);
}

function stopTimer() {
    startButton.disabled = false;
    stopButton.disabled = true;

    clearInterval(timerInterval);
}

function resetTimer() {
    clearInterval(timerInterval);
    elapsedTime = 0;
    updateDisplay();

    startButton.disabled = false;
    stopButton.disabled = true;
    resetButton.disabled = true;

    // Clear laps
    lapsList.innerHTML = '';
}

function addLap() {
    const li = document.createElement('li');
    li.textContent = display.textContent;
    lapsList.insertBefore(li, lapsList.firstChild);
}

startButton.addEventListener('click', startTimer);
stopButton.addEventListener('click', stopTimer);
resetButton.addEventListener('click', resetTimer);

// Initialize display
updateDisplay();Primary Keywords
- Stopwatch using HTML CSS JavaScript
- Create a Stopwatch with JavaScript
- HTML CSS JavaScript Stopwatch Project
- JavaScript Stopwatch Code Example
- Build Stopwatch from Scratch
Secondary Keywords
- Beginner Stopwatch Project
- JavaScript Timer Example
- Web Development Stopwatch Project
- Stopwatch UI Design with CSS
- Functional Stopwatch JavaScript
Long-Tail Keywords
- How to Create a Stopwatch with HTML, CSS, and JavaScript
- Step-by-Step Guide to Build a Stopwatch
- Stopwatch with Start, Stop, and Reset Buttons JavaScript
- Build and Style Stopwatch for Beginners
- JavaScript Stopwatch for Web Development
Trending Keywords for 2025
- JavaScript Projects for Beginners 2025
- HTML CSS JavaScript Small Projects 2025
- Stopwatch Project Ideas 2025