Introduction
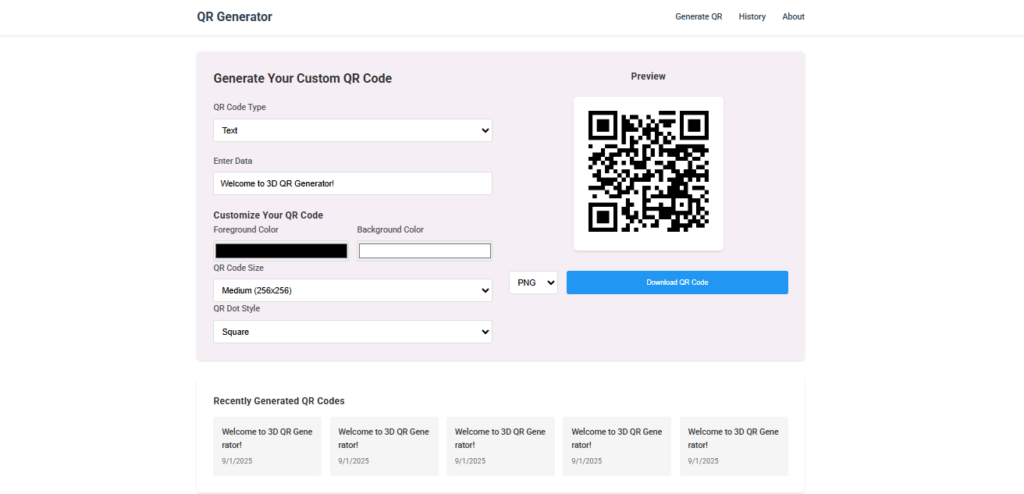
This guide explains how to create your own online custom QR code generator with stunning 3D designs, colorful gradients, and advanced customization options.
Features to Include in Your QR Code Generator
Step 1: HTML Structure
First, create the basic structure for the card slider. Below is a simple HTML template:
<!DOCTYPE html>
<html lang="en">
<head>
<meta charset="UTF-8">
<meta name="viewport" content="width=device-width, initial-scale=1.0">
<title>Custom QR Code Generator</title>
<link rel="stylesheet" href="styles/main.css">
<link href="https://fonts.googleapis.com/css2?family=Roboto:wght@300;400;500;700&display=swap" rel="stylesheet">
<script src="https://cdn.jsdelivr.net/npm/qr-code-styling@1.5.0/lib/qr-code-styling.min.js"></script>
</head>
<body>
<header class="header">
<nav class="nav-container">
<div class="logo">QR Generator</div>
<ul class="nav-links">
<li><a href="#" class="active">Generate QR</a></li>
<li><a href="#history">History</a></li>
<li><a href="#about">About</a></li>
</ul>
</nav>
</header>
<main class="container">
<div class="qr-generator">
<div class="input-section">
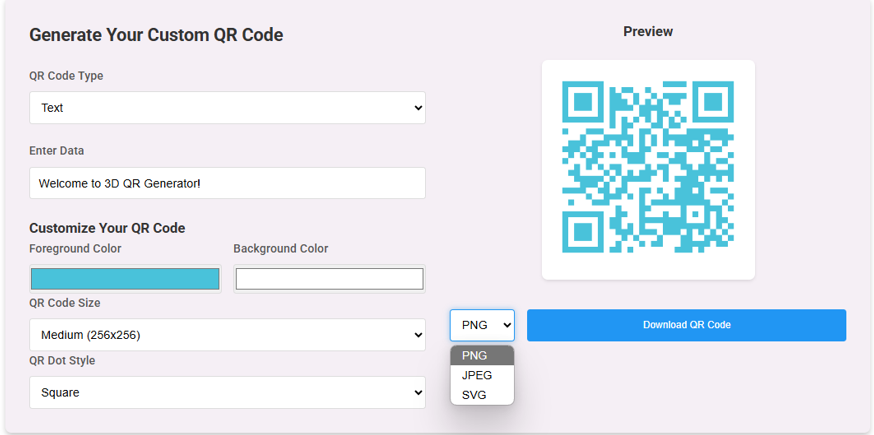
<h2>Generate Your Custom QR Code</h2>
<div class="form-group">
<label for="qr-type">QR Code Type</label>
<select id="qr-type" class="form-control">
<option value="text">Text</option>
<option value="url">URL</option>
<option value="phone">Phone Number</option>
<option value="email">Email Address</option>
<option value="wifi">Wi-Fi Details</option>
</select>
</div>
<div class="form-group">
<label for="qr-data">Enter Data</label>
<input type="text" id="qr-data" class="form-control" placeholder="Enter text or URL">
</div>
<div class="customization-section">
<h3>Customize Your QR Code</h3>
<div class="color-pickers">
<div class="form-group">
<label for="foreground-color">Foreground Color</label>
<input type="color" id="foreground-color" value="#000000">
</div>
<div class="form-group">
<label for="background-color">Background Color</label>
<input type="color" id="background-color" value="#FFFFFF">
</div>
</div>
<div class="form-group">
<label for="qr-size">QR Code Size</label>
<select id="qr-size" class="form-control">
<option value="128">Small (128x128)</option>
<option value="256" selected>Medium (256x256)</option>
<option value="512">Large (512x512)</option>
</select>
</div>
<div class="form-group">
<label for="qr-style">QR Dot Style</label>
<select id="qr-style" class="form-control">
<option value="square">Square</option>
<option value="dots">Dots</option>
<option value="rounded">Rounded</option>
</select>
</div>
</div>
</div>
<div class="preview-section">
<h3>Preview</h3>
<div id="qr-preview"></div>
<div class="download-options">
<select id="download-format" class="form-control">
<option value="png">PNG</option>
<option value="jpeg">JPEG</option>
<option value="svg">SVG</option>
</select>
<button id="download-btn" class="btn btn-primary">Download QR Code</button>
</div>
</div>
</div>
<div class="history-section" id="history">
<h3>Recently Generated QR Codes</h3>
<div id="history-container" class="history-grid"></div>
</div>
</main>
<footer class="footer">
<div class="footer-content">
<p>Create beautiful custom QR codes instantly</p>
<div class="social-links">
<a href="#" class="social-icon">Share</a>
<a href="#" class="social-icon">Contact</a>
</div>
<p class="copyright"> 2024 QR Generator. All rights reserved.</p>
</div>
</footer>
<script src="js/qr-generator.js"></script>
</body>
</html>1. Input Data Options
Step 2: CSS for Styling the Slider
Add CSS to style the card slider and make it responsive. Below is an example of basic styling:
:root {
    --primary-color: #2c3e50;
    --secondary-color: #3498db;
    --accent-color: #e74c3c;
    --text-color: #333;
    --light-gray: #f5f6fa;
    --white: #ffffff;
    --glow-color: rgba(52, 152, 219, 0.5);
}

* {
    margin: 0;
    padding: 0;
    box-sizing: border-box;
}

body {
    font-family: 'Roboto', sans-serif;
    line-height: 1.6;
    color: var(--text-color);
}

/* Header styles */
.header {
    background-color: var(--white);
    box-shadow: 0 2px 5px rgba(0,0,0,0.1);
}

.nav-container {
    max-width: 1200px;
    margin: 0 auto;
    padding: 1rem;
    display: flex;
    justify-content: space-between;
    align-items: center;
}

.logo {
    font-size: 1.5rem;
    font-weight: 700;
    color: var(--primary-color);
}

.nav-links {
    display: flex;
    list-style: none;
    gap: 2rem;
}

.nav-links a {
    text-decoration: none;
    color: var(--primary-color);
    font-weight: 500;
    transition: color 0.3s ease;
}

.nav-links a:hover {
    color: var(--secondary-color);
}

/* Main container */
.container {
    max-width: 1200px;
    margin: 2rem auto;
    padding: 0 1rem;
}

/* QR Generator layout */
.qr-generator {
    display: grid;
    grid-template-columns: 1fr 1fr;
    gap: 2rem;
    background-color: #f5eff5;
    padding: 2rem;
    border-radius: 8px;
    box-shadow: 0 2px 4px rgba(0,0,0,0.1);
    transition: box-shadow 0.3s ease;
}

.qr-generator:hover {
    box-shadow: 0 4px 8px rgba(0,0,0,0.2);
}

/* Input section styles */
.input-section {
    display: flex;
    flex-direction: column;
    gap: 1.5rem;
}

.form-group {
    display: flex;
    flex-direction: column;
    gap: 0.5rem;
}

.form-group label {
    font-weight: 500;
    color: #555;
}

.form-control {
    padding: 0.75rem;
    border: 1px solid #ddd;
    border-radius: 4px;
    font-size: 1rem;
    transition: border-color 0.3s;
}

.form-control:hover {
    border-color: var(--secondary-color);
}

.form-control:focus {
    outline: none;
    border-color: #2196f3;
    box-shadow: 0 0 8px var(--glow-color);
}

/* Color pickers */
.color-pickers {
    display: grid;
    grid-template-columns: 1fr 1fr;
    gap: 1rem;
}

input[type="color"] {
    width: 100%;
    height: 40px;
    padding: 0;
    border: 1px solid #ddd;
    border-radius: 4px;
}

/* Preview section */
.preview-section {
    display: flex;
    flex-direction: column;
    align-items: center;
    gap: 1.5rem;
}

#qr-preview {
    background-color: #fff;
    padding: 1rem;
    border-radius: 8px;
    box-shadow: 0 2px 4px rgba(0,0,0,0.1);
    transition: all 0.3s ease;
}

#qr-preview:hover {
    transform: translateY(-5px);
    box-shadow: 0 8px 16px rgba(0,0,0,0.2);
}

.glow-effect {
    animation: glow 2s ease-in-out infinite;
}

@keyframes glow {
    0%, 100% {
        box-shadow: 0 0 10px var(--glow-color);
    }
    50% {
        box-shadow: 0 0 20px var(--glow-color),
                    0 0 30px var(--glow-color);
    }
}

/* Download options */
.download-options {
    display: flex;
    gap: 1rem;
    width: 100%;
    margin-top: 1rem;
}

.btn {
    padding: 0.75rem 1.5rem;
    border: none;
    border-radius: 4px;
    font-weight: 500;
    cursor: pointer;
    transition: all 0.3s ease;
    position: relative;
    overflow: hidden;
}

.btn-primary {
    background-color: #2196f3;
    color: #fff;
    flex: 1;
}

.btn-primary:hover {
    background-color: #1976d2;
    transform: translateY(-2px);
    box-shadow: 0 4px 12px var(--glow-color);
}

.btn-primary:active {
    transform: translateY(0);
}

/* History section */
.history-section {
    margin-top: 2rem;
    background-color: #fff;
    padding: 2rem;
    border-radius: 8px;
    box-shadow: 0 2px 4px rgba(0,0,0,0.1);
}

.history-grid {
    display: grid;
    grid-template-columns: repeat(auto-fill, minmax(200px, 1fr));
    gap: 1rem;
    margin-top: 1rem;
}

.history-item {
    padding: 1rem;
    background-color: #f5f5f5;
    border-radius: 4px;
    cursor: pointer;
    transition: all 0.3s ease;
}

.history-item:hover {
    background-color: #e0e0e0;
    transform: translateY(-2px);
    box-shadow: 0 4px 8px rgba(0,0,0,0.1);
}

.history-data {
    font-weight: 500;
    margin-bottom: 0.5rem;
    word-break: break-all;
}

.history-date {
    font-size: 0.875rem;
    color: #666;
}

/* Footer */
.footer {
    background-color: #fff;
    padding: 2rem 0;
    margin-top: 3rem;
    box-shadow: 0 -2px 4px rgba(0,0,0,0.1);
}

.footer-content {
    max-width: 1200px;
    margin: 0 auto;
    text-align: center;
}

.social-links {
    margin: 1rem 0;
}

.social-icon {
    margin: 0 0.5rem;
    color: #666;
    text-decoration: none;
}

.social-icon:hover {
    color: #2196f3;
}

/* Responsive design */
@media (max-width: 768px) {
    .qr-generator {
        grid-template-columns: 1fr;
    }

    .nav-container {
        flex-direction: column;
        gap: 1rem;
    }

    .nav-links {
        flex-direction: column;
        align-items: center;
        gap: 1rem;
    }

    .color-pickers {
        grid-template-columns: 1fr;
    }
}
Allow users to generate QR codes for:
- Text
- URLs
- Email addresses
- Phone numbers
- Wi-Fi credentials
Provide a clean, user-friendly input form to make the process seamless.
Step 3: JavaScript for Sliding Functionality
Use JavaScript to add the functionality that allows the cards to slide when the buttons are clicked:
// QR Code Generator functionality
const qrCodeInstance = new QRCodeStyling({
    width: 256,
    height: 256,
    data: "Welcome to QR Generator!",
    dotsOptions: {
        color: "#000000",
        type: "square"
    },
    backgroundOptions: {
        color: "#FFFFFF",
    }
});

// DOM Elements
const qrData = document.getElementById('qr-data');
const qrType = document.getElementById('qr-type');
const foregroundColor = document.getElementById('foreground-color');
const backgroundColor = document.getElementById('background-color');
const qrSize = document.getElementById('qr-size');
const qrStyle = document.getElementById('qr-style');
const downloadBtn = document.getElementById('download-btn');
const downloadFormat = document.getElementById('download-format');
const qrPreview = document.getElementById('qr-preview');
const historyContainer = document.getElementById('history-container');

// Initialize QR Code
qrCodeInstance.append(qrPreview);

// Function to update QR code
function updateQRCode() {
    const data = qrData.value || "Welcome to QR Generator!";
    const size = parseInt(qrSize.value);

    qrCodeInstance.update({
        data: data,
        width: size,
        height: size,
        dotsOptions: {
            color: foregroundColor.value,
            type: qrStyle.value
        },
        backgroundOptions: {
            color: backgroundColor.value
        }
    });

    // Add glow effect when QR code is updated
    const preview = document.getElementById('qr-preview');
    preview.classList.add('glow-effect');

    // Remove glow effect after animation
    setTimeout(() => {
        preview.classList.remove('glow-effect');
    }, 2000);

    // Save to history
    saveToHistory({
        data: data,
        timestamp: new Date().toISOString()
    });
}

// Event listeners for real-time updates
[qrData, qrType, foregroundColor, backgroundColor, qrSize, qrStyle].forEach(element => {
    element.addEventListener('input', updateQRCode);
});

// Handle QR code type changes
qrType.addEventListener('change', function() {
    const type = this.value;
    let placeholder = "";

    switch(type) {
        case 'url':
            placeholder = "Enter URL (e.g., https://example.com)";
            break;
        case 'phone':
            placeholder = "Enter phone number";
            break;
        case 'email':
            placeholder = "Enter email address";
            break;
        case 'wifi':
            placeholder = "WIFI:S:<SSID>;T:<WPA|WEP>;P:<password>;;";
            break;
        default:
            placeholder = "Enter text";
    }

    qrData.placeholder = placeholder;
});

// Download functionality
downloadBtn.addEventListener('click', () => {
    const format = downloadFormat.value;
    const filename = `qr-code-${Date.now()}.${format}`;
    qrCodeInstance.download({
        extension: format,
        name: filename
    });
});

// History functionality
function saveToHistory(item) {
    let history = JSON.parse(localStorage.getItem('qrHistory') || '[]');
    history.unshift(item);
    history = history.slice(0, 5); // Keep only last 5 items
    localStorage.setItem('qrHistory', JSON.stringify(history));
    updateHistoryDisplay();
}

function updateHistoryDisplay() {
    const history = JSON.parse(localStorage.getItem('qrHistory') || '[]');
    historyContainer.innerHTML = history.map(item => `
        <div class="history-item" data-value="${item.data}">
            <p class="history-data">${item.data}</p>
            <p class="history-date">${new Date(item.timestamp).toLocaleDateString()}</p>
        </div>
    `).join('');

    // Add click event to history items
    document.querySelectorAll('.history-item').forEach(item => {
        item.addEventListener('click', () => {
            qrData.value = item.dataset.value;
            updateQRCode();
        });
    });
}

// Initialize history display
updateHistoryDisplay();
2. Advanced Customization
Colors and Gradients
- Foreground and background color pickers.
- Gradient options (linear and radial).
3D Effects
- Add depth and shadow to QR codes to make them visually striking.
- Use CSS and libraries like Three.js for real 3D designs.
Custom Shapes
- Replace square dots with circles, stars, or custom SVG shapes.
3. Real-Time Preview
Enable a real-time preview of the QR code as users make changes. Use libraries like qrcode.js or qr-code-styling for dynamic updates.
4. Download Options
Allow users to download QR codes in various formats:
- PNG
- JPEG
- SVG
Provide high-resolution downloads for professional use.
5. Logo Embedding
Let users upload their own logo and place it at the center of the QR code. Add options for scaling and positioning the logo.
6. Animation Effects (Optional)
- Add subtle animations like pulsing dots or color transitions.
- Use CSS animations or GSAP for smooth effects.
7. Responsive Design
Ensure the website is mobile-friendly and fully responsive for all screen sizes.
8. Social Sharing
Integrate social sharing buttons for platforms like WhatsApp, Instagram, and LinkedIn.
Step-by-Step Guide to Create the Website
1. Set Up the Basics
- Use HTML for the structure.
- Style with CSS (modern frameworks like Tailwind CSS can save time).
- Add interactivity with JavaScript.
2. Use a QR Code Library
- qrcode.js: Lightweight and easy to use.
- qr-code-styling: Ideal for customization (gradients, shapes, logos).
3. Add Real-Time Customization
Use JavaScript to dynamically update the QR code preview as users make changes.
4. Implement 3D Effects
- Use CSS box-shadow for basic 3D effects.
- For advanced designs, integrate Three.js to create interactive 3D models.
5. Enable Downloads
Use JavaScript to generate downloadable QR codes in PNG, JPEG, or SVG formats.
6. Optimize for Mobile
Ensure all elements are responsive with media queries and flexible layouts.
SEO Strategy to Rank Your Website
1. Keyword Optimization
Use the following keywords strategically in your content, meta tags, and headings:
- Online custom QR code generator 2025
- 3D QR code maker free
- Download colorful QR codes
- Create personalized QR codes
2. Meta Tags
- Title: Create 3D Custom QR Codes Online | Free QR Code Generator 2025
- Description: Generate 3D and colorful QR codes with logos and animations. Download in PNG, JPEG, or SVG formats for free.
3. Alt Text
For every QR code preview or example image, include descriptive alt text, e.g., “Custom 3D QR Code with Gradient Colors.”
4. Add a Blog Section
Write articles targeting long-tail keywords, such as:
- “Top 10 Uses of QR Codes in 2025”
- “How to Create Animated QR Codes for Branding”
- “Benefits of Custom QR Codes for Small Businesses”
5. Page Speed Optimization
- Minimize CSS and JavaScript files.
- Use a CDN for faster loading times.
Introduction
Monetization Ideas
1. Freemium Model
- Offer basic features for free.
- Charge for advanced options like logo embedding or high-resolution downloads.
2. Advertisements
Integrate Google Ads to generate passive income.
3. Premium Memberships
Provide unlimited downloads and exclusive designs for a monthly or yearly subscription.